Git, from zero to hero
Prepare yourself. This is a git tutorial, also GitHub tutorial, and also a theoretical class about versioning.
First, let’s talk about VCS (Version Control System). VCS is a kind of system we need as software engineers to make sure our code is not only up to date, but to have control of all the versions. Git is one tool to implement VCS. In other words:
Git is a tool used to control versions
What makes git different from all other VCS?
On the other VCSs, it’s used a common delta-based version control, which means you have to look at the changes over the time. On git, there are snapshots.
Git data is like a series of snapshots
Nearly Every Operation Is Local
This title almost speaks for itself. You can have your files locally and only use a command-line interface (CLI) to push or pull your data into the git server you are using.
You can work offline with git
Git Has Integrity
Everything in Git is checksummed before it is stored and is then referred to by that checksum. This means it’s impossible to change the contents of any file or directory without Git knowing about it. This functionality is built into Git at the lowest levels and is integral to its philosophy.
You can’t lose information in transit or get file corruption without Git being able to detect it
The Three States
Git has three main states that your files can reside in: modified, staged, and committed:
- Modified means that you have changed the file but have not committed it to your database yet.
- Staged means that you have marked a modified file in its current version to go into your next commit snapshot.
- Committed means that the data is safely stored in your local database.

The basic Git workflow goes something like this:
- You modify files in your working tree.
- You selectively stage just those changes you want to be part of your next commit, which adds only those changes to the staging area.
- You do a commit, which takes the files as they are in the staging area and stores that snapshot permanently to your Git directory.
Your Identity
On your first time using git, you should set your username and email address. This is important because every Git commit uses this information, and it’s immutably baked into the commits you start creating:
$ git config --global user.name "John Doe"
$ git config --global user.email johndoe@example.com
It is also possible to set your default branch name:
$ git config --global init.defaultBranch mainLet’s get deeper with the most important git commands
What is Git commit?
Commits are the units that have timelines, like milestones or events. With the commit command, we are creating those individual events.

The commit command captures a snapshot of a project at a particular moment in development.
What is Git checkout?
The git checkout command is a way of switching between branches or restoring working tree files. Think of this as switching between different versions or features of a project. It’s also possible to create new branches using this command, you will see later on this tutorial.
What is a Git clone?
The git clone command is used to copy a repository. You then have your own version of that repo and can start editing it without altering the original. In general, the original is on a remote server, like GitHub, GitLab, Bitbucket, etc.
What is Git pull?
The git pull command can be used to access and download files from a remote repository and update your local repository, so it matches the updates to the original. Think of this like you're merging your version and the original. The git pull command is made up of two commands: git fetch and then git merge.
What is Git tag?
Tags are a reference to a specific moment in a Git repo’s file history. Think of this like a branch that doesn’t change. Tagging allows you to mark important checkpoints in a project’s timeline (i.e. software version releases).
Hello World — Hands on with GitHub
From this moment, I will treat git as GitHub, since this is the tool using git I’m most familiar with. GitHub is a code hosting platform for version control and collaboration.
In this guide, you will:
- Create and use a repository
- Start and manage a new branch
- Make changes to a file and push them to GitHub as commits
- Open and merge a pull request
To complete this tutorial, you need a GitHub account and Internet access. Don’t worry, you don’t need to know how to code.
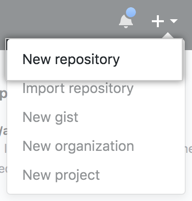
Creating a repository
A repository is usually used to organize a single project.
In the upper-right corner of any page, use the drop-down menu, and select New repository.
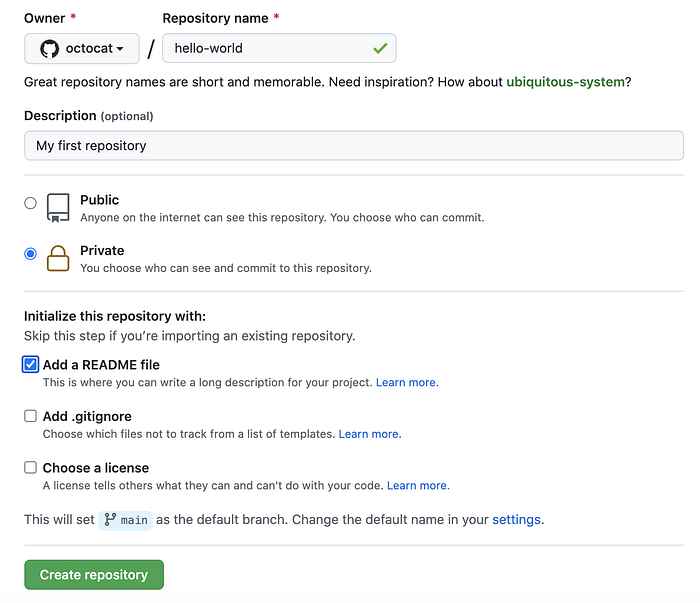
- In the Repository name box, enter
hello-world. - In the Description box, write a short description.
- Select Add a README file.
- Select whether your repository will be Public or Private.
- Click Create repository.
Branche who?
By default, your repository has one branch named main that is considered being the definitive branch. The work done on different branches will not show up on the main branch until you merge it, which we will cover later in this guide. You can use branches to experiment and make edits before committing them to main.
Branching lets you have different versions of a repository at one time. You can actually have a lot of different people working on different branches at the same time, on different features.
When you create a branch off the main branch, you're making a copy, or snapshot, of main as it was at that point in time. If someone else made changes to the main branch while you were working on your branch, you could pull in those updates.
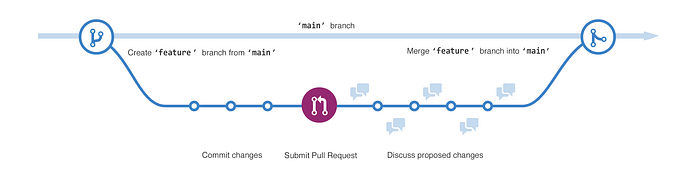
This diagram shows:
- The
mainbranch - A new branch called
feature - The journey that
featuretakes before it's merged intomain
Have you ever saved different versions of a file? Something like:
story.txtstory-edit.txtstory-edit-reviewed.txt
Branches accomplish similar goals in GitHub repositories, where the different commits are the different savings.
Create a branch
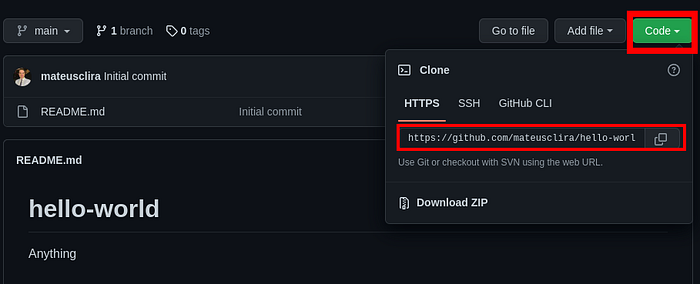
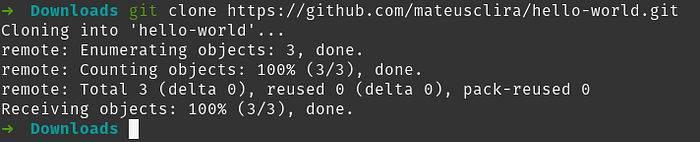
For this part, I suggest you use VS Code. But first, go to your repo (short for repository) and clone your repo into your local files. To do so, use the terminal and the command git clone with the link you get on your repo.
From now on, let’s use the VS Code to help us look at our files.
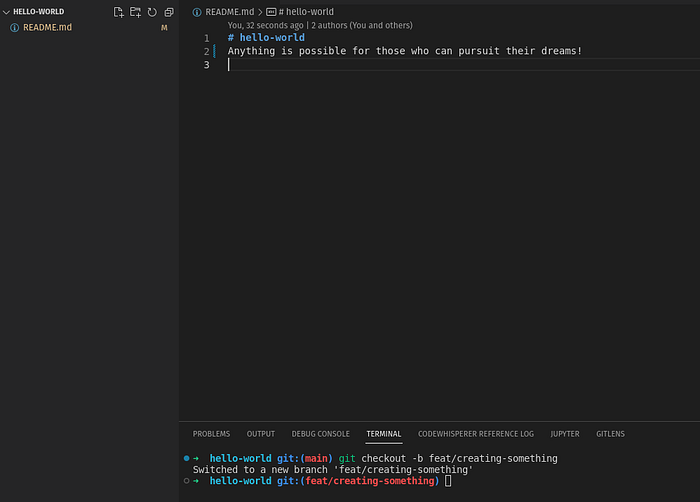
The checkout command can be used to create a new branch
git checkout -b feat/creating-something
The git will understand we have a new branch and automatically switch to it.
Making and committing changes
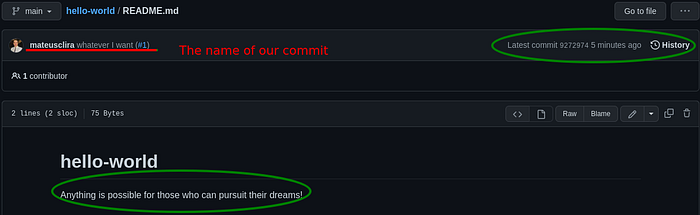
First, let’s make a change and save it. Changing the file README.md
You can see there is an “M” on the right of the name of the file. It means the file is tracked as modified. As we saw earlier, it is one of the three states on git “modified, staged, and committed”.
So, now we need to stage this change, putting this file into the staging area, in order to git understand the file is ready to be committed. To do so, we have the command “add”
git add README.md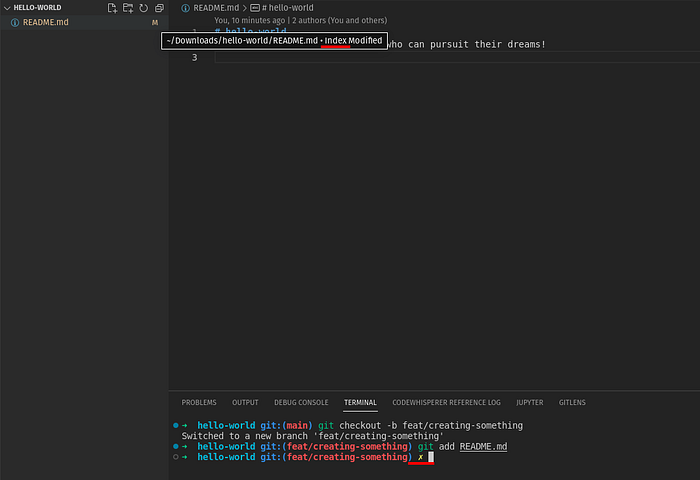
Pay attention here to the name “index” now when we hover over the file name. It is now in the staging area. Another thing to be aware: there is a new icon where we put our command. That icon means we have something ready to commit.
So now, we should commit with the commit command.
git commit -m "whatever I want"Always create a coherent message. Lucky you, I searched for you already for the best approach to do so.
Opening a pull request
So, now that we committed our changes, we need to push it. Let’s say you have cloned an open-source software, made some changes, and now you want to improve their code.
All you did was in your own branch, your git. How can you put it back in their git, so your changes can not only be seen by others but used as their mainstream program?
This is the concept of creating a PR (Pull Request). When you request someone to review your code, and when someone finishes reviewing it, you can get to the next level: merging your code with them.
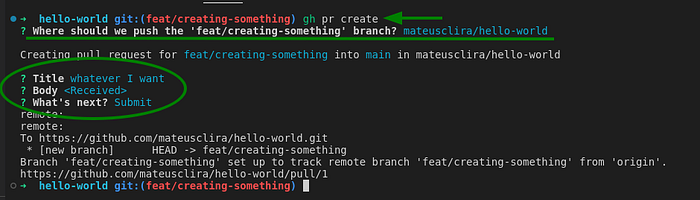
We can actually choose respectively where to do the pull request, the title, the URI of the pull request (body), and if we are ready to submit.
Merging a pull request
Ok, now you are the code owner. Someone came with a PR to your code. And you loved their idea. After reviewing the code, you are now able to merge it.
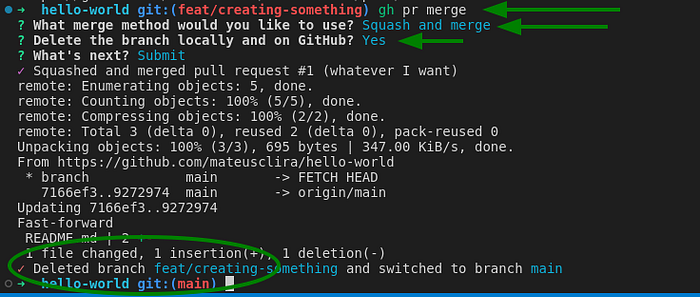
Have a look at our options, but even a closer look down there. Using the GitHub CLI and the option to delete the branch locally and on GitHub, our terminal gets automatically back to our main branch.
Now let’s get down on theory
How so? I mean, you already know everything, right? I bet you feel fearless enough to do a PR on a WireGuard project already, so let’s close it here.
Just kidding. There in the road, in 2010, Vincent Driessen created the GitFlow, and then there is another flow created for working with Git worth mentioning: Trunk-Based-Development.
But before I get into those flows, what exactly is a flow in this context I’m bringing to you?
It is a procedure focused on how to create and close branches
GitFlow
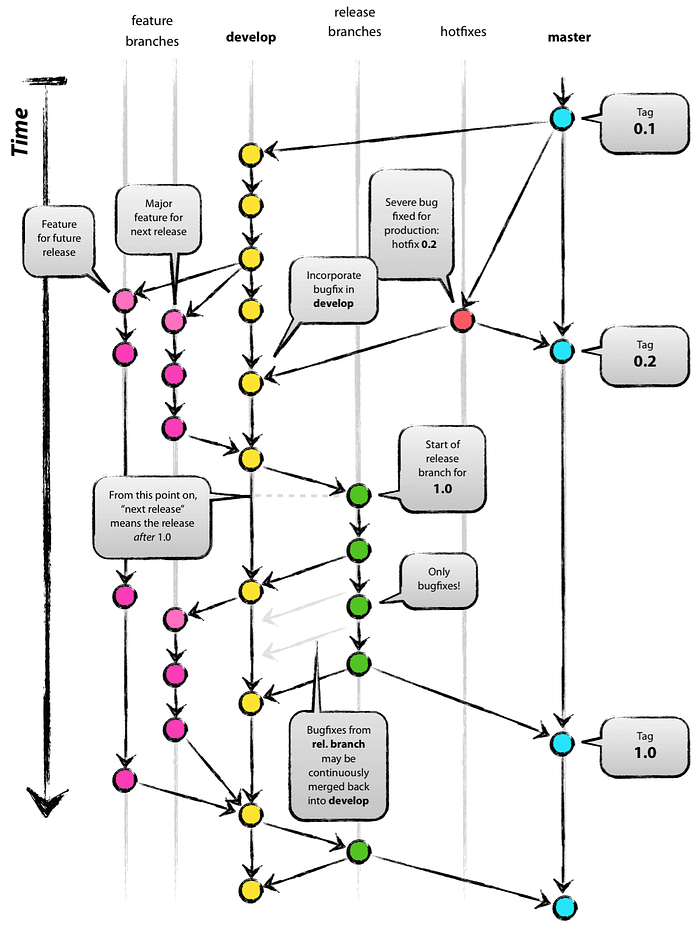
The image speaks for itself, right? Case closed.
Try to look from right to left and do your best to not feel lost. The image is complex. Read it slowly and, if needed, multiple times.
- Every development here starts on the Master branch.
- The development team pulls the code into a dev environment (branch).
- Devs create different branches for each feature.
- When the feature gets reviewed, all of them get grouped on the dev branch.
- After everything gets tested on the dev branch, we create the staging branch (green one called release).
- Then, finally, when everything looks fine, we do our final push into the Master branch, tagging it with the new version of production.
That Red branch over there is called a hotfix not by accident. It is when something gets broken and needs an immediate fix, so it cannot wait for all the process I showed here on the steps.
Advantages:
- Project type : open-source, since anyone can open a PR to contribute
- Team size: no limit (small, medium, large)
- Developer experiences: suitable for a team with a lot of junior developer
- Suitable for product development that already established before.
Disadvantages
- Not suitable for starting-up development
- Reduce development-speed on fast iterations.
- Senior developer would easy to feel uncomfortable (due to strict control).
- Flow visualization looks very complex
Trunk-Based-Development

OK, that looks extremely simple. Something is not right here. Is it for kids? Unfortunately, no. This is way more focused on senior developers than our previous GitFlow.
TBD is a source-control branching model, where developers collaborate on code in a single branch called “trunk” (main, in Git nomenclature), resist any pressure to create other long-lived development branches by employing documented techniques.
How does this flow works?
- Developer start work on the main branch or create a short-lived-feature branch (a branch from trunk) and start work on them.
- Once they are done with compiling and all testing, they push all changes to trunk (or merge to trunk) directly (without making a pull-request).
So, even though they are experts, how they can make sure things don’t break? This seems to be not ideal, as many people working in the same environment.
The key to it is CI (Continuous Integration). The daemons are always watching the trunk (and the short-lived feature branches used in review), and as quickly and completely as possible loudly/visibly inform the team that the trunk is broken. Some teams will lock the trunk and roll-back changes. Others will allow the CI server to do that automatically.

The high bar is verifying the commit before it lands in the trunk. Short-lived Pull Request branches are the modern place for that.
Advantages
- Project-type: closed source
- Suitable for starting-up development
- Support fast iteration development
- Developer experiences: suitable for a team with a lot of senior developer (no need strict control).
- Flow visualization looks very simple
Disadvantages
- Not suitable for open-source development
- Not suitable for a team with a lot of junior developer
- Not suitable when we have established product or manage large teams that implement strict-control due to business needs.
Summing up
Using git is not only about getting your local files into some repo. As with anything in your life, you need to know what you are doing before you do it, or you have the chance to mess everything up.
OK, you have all the right to do it personally, but the minute you do it professionally, you lose that chance. So, not only get good in it, but aim to be perfect. How can anyone accept your PR if there are errors?
That is why I’m giving you here my last tips. Don’t stop here.
Go further
Every software developer needs to have a deep understanding of versioning code.